 Pin It
 I still remember the first time I built a gingerbread house frame from scratch—it was a snowy afternoon when my sister challenged me to create something that would make our holiday table feel magical. I'd always thought gingerbread houses were impossible, reserved for professional bakers with steady hands and endless patience. But then I realized that a frame is far more forgiving than a full house, and so much more charming. Now, every December, I find myself in the kitchen, mixing warm spices and molasses, knowing that what I'm building isn't just decoration—it's an edible centerpiece that brings everyone together.
Last year, I assembled this frame while my nephew watched from the kitchen counter, asking a thousand questions about why the gingerbread had to be cold and why we couldn't eat the royal icing yet. His patience lasted about three minutes, but his face when he saw the finished frame surrounded by cookies—that made every careful brushstroke worth it. Now he asks me every November if we're making 'the house frame again.'
Ingredients
- All-purpose flour (300 g): This is your foundation, and it needs to be measured correctly—too much and your gingerbread becomes tough and difficult to cut cleanly. I always spoon and level, never scoop directly from the bag.
- Brown sugar (100 g): The slight molasses notes in brown sugar deepen the flavor in ways white sugar simply can't. Pack it gently into your measuring cup so you get the right weight without crushing it too hard.
- Unsalted butter, softened (100 g): Soft butter creams properly with sugar, creating that light texture. If yours is rock-hard, let it sit on the counter for about 15 minutes—it makes a real difference in how easily everything combines.
- Molasses or dark honey (100 g): This is where the soul of gingerbread lives. Dark molasses gives deeper color and richer flavor than light. If you only have honey, that works too, though the taste will be slightly different.
- Large egg (1): Room temperature eggs bind better and mix more smoothly. I learned this after one cold egg made my dough split awkwardly while mixing.
- Ground ginger (1 tsp): Fresh ground tastes better than pre-ground if you have it, but what matters most is that you're not using old spice from the back of your cabinet. If it doesn't smell warm and alive, replace it.
- Ground cinnamon (1 tsp): Cinnamon bridges the sharp ginger and cloves beautifully. This is not the time to be shy with spices.
- Ground cloves (½ tsp): A little clove goes a long way—I once added a full teaspoon and it tasted like Christmas medicine. Stick with the half teaspoon.
- Baking soda (½ tsp): This helps the dough rise slightly and gives it a tender crumb. It reacts with the molasses's slight acidity, so don't skip it.
- Salt (¼ tsp): Salt doesn't make things taste salty; it makes spices taste more like themselves. Trust it.
- Egg white (1): For the royal icing, room temperature works best. If you're using pasteurized eggs, no worries. If you're nervous, use powdered egg white instead.
- Powdered sugar, sifted (200 g): Sifting removes lumps and creates smooth icing that spreads and holds beautifully. It takes two minutes and changes everything.
- Lemon juice (½ tsp): This brightens the icing and helps it set properly. Fresh lemon juice tastes better than bottled, but either works.
- White chocolate, melted (50 g): White chocolate creates beautiful drizzles that look like snow. Melt it gently over low heat or in short bursts in the microwave so it doesn't seize.
- Assorted candies: This is where your personality enters the house. White and brown candies create a cohesive look, but choose what makes you happy—chocolate buttons, white sprinkles, mini marshmallows, whatever speaks to you.
- Edible glitter or silver pearls (optional): These catch the light and make your frame look genuinely magical. Absolutely optional, but if you use them, a tiny amount goes such a long way.
Tired of Takeout? 🥡
Get 10 meals you can make faster than delivery arrives. Seriously.
One email. No spam. Unsubscribe anytime.
Instructions
- Cream the butter and sugar:
- In a large bowl, beat the softened butter and brown sugar together for about 2 minutes. You're looking for something light and fluffy, almost cloud-like. This is what gives your gingerbread its tender texture. Use an electric mixer if you have one—your arms will thank you—or whisk vigorously by hand. The mixture should pale slightly and feel airy when you lift the whisk.
- Add the wet ingredients:
- Beat in the egg first, letting it fully incorporate before adding the molasses. The mixture might look a little separated at first—that's normal. Keep mixing until everything comes together into a smooth, cohesive mixture. You'll smell the molasses deeply now, and if you pause to inhale, you're already thinking about the finished house.
- Combine the dry ingredients:
- In a separate bowl, whisk together the flour, ginger, cinnamon, cloves, baking soda, and salt. This step might seem unnecessary, but whisking distributes the leavening and spices evenly, so you don't end up with pockets of pure clove or weird dense spots. Take a moment here.
- Bring the dough together:
- Gradually add the dry mixture to the wet ingredients, stirring gently until a smooth dough forms. Don't overmix once the flour is incorporated—you're not making bread. The dough should feel smooth and slightly sticky. Wrap it tightly in plastic wrap and refrigerate for at least 30 minutes. This is when I usually brew tea or put on a holiday playlist, knowing the kitchen is about to get deliciously busy.
- Prepare your workspace:
- While the dough chills, preheat your oven to 180°C (350°F). Line a baking sheet with parchment paper. If you have a gingerbread house template, print and cut it now. If not, you can draw simple panels on cardboard—a rectangle for the front, one for the back, two for sides, and two for the roof. These don't need to be perfect; your gingerbread house frame is forgiving.
- Roll and cut:
- On a lightly floured surface, roll out your chilled dough to about 5 mm thickness. This thickness is crucial—too thin and your panels break; too thick and they don't bake evenly. Using your template or a knife, cut out the panels carefully. Gently transfer them to your parchment-lined sheet, leaving a little space between each piece. I always save the scraps for testing—a little warm gingerbread cookie while you work is non-negotiable.
- Bake with attention:
- Bake for 10 to 12 minutes, watching them carefully toward the end. You're looking for the edges to feel firm when you touch them gently, while the centers are still slightly soft. This gives you panels that are sturdy enough to build with but still tender to eat. The kitchen will smell absolutely incredible. Remove from the oven and let cool completely on a wire rack—this matters for stability.
- Make the royal icing:
- Beat the egg white to soft peaks, which looks like thick foam with gentle peaks that curl over. Gradually add the sifted powdered sugar, a little at a time, beating continuously. Add the lemon juice near the end. You want a thick, glossy icing that holds a peak when you lift the whisk but is still spreadable. This is your edible glue, and getting it right makes assembly so much easier.
- Assemble with patience:
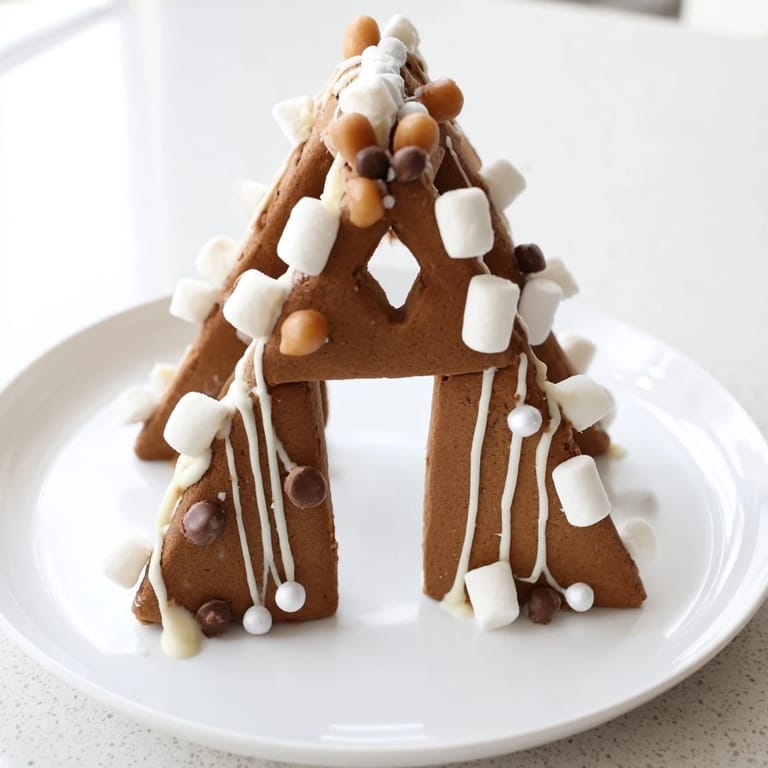
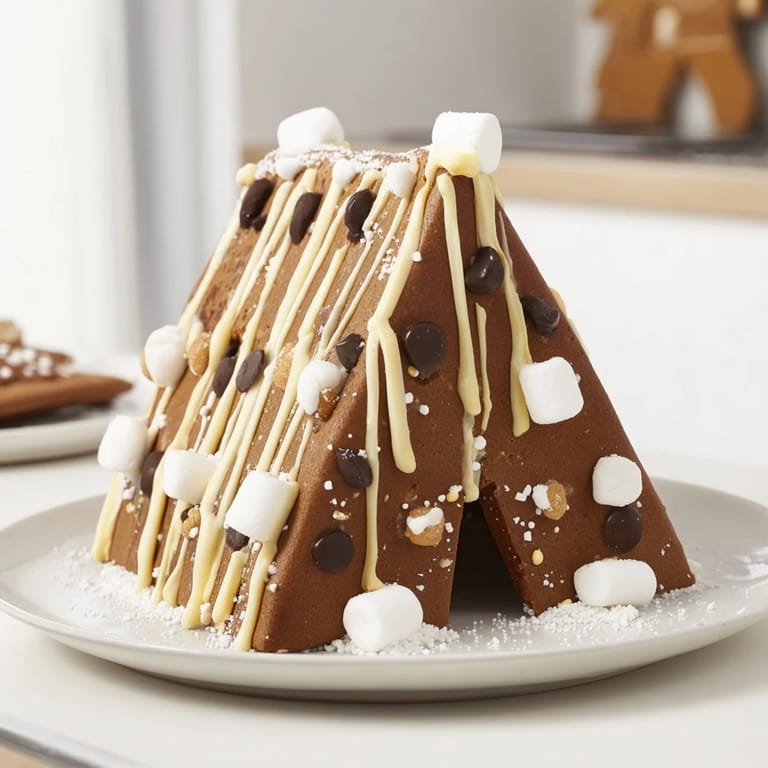
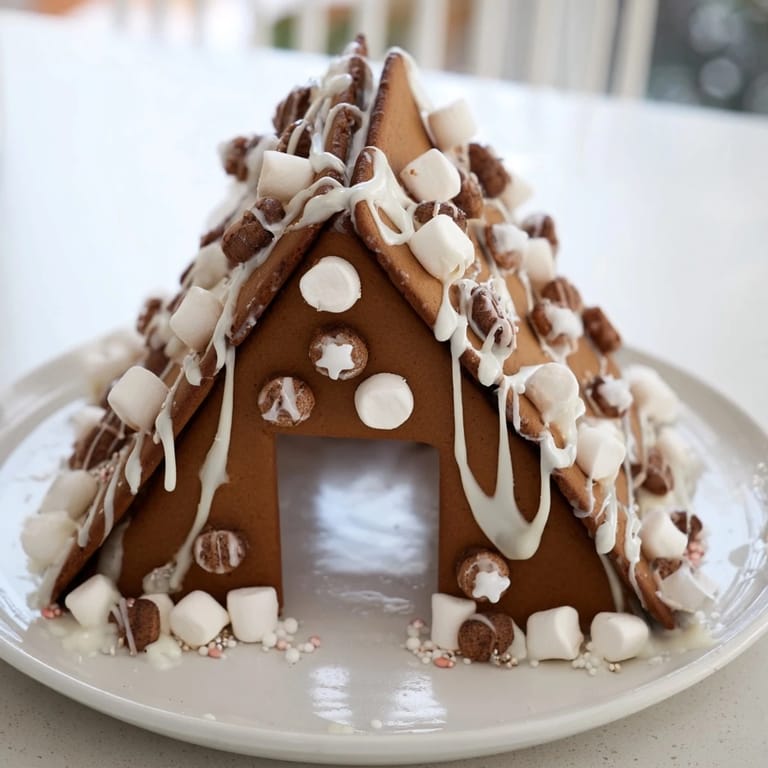
- This is the moment. Pipe or spread a generous line of royal icing along the edges of your first panel. Press a second panel against it, holding it gently for a moment until it feels set. Work your way around, building your frame. Yes, you'll get icing on your fingers. Yes, it's part of the charm. Once you have all panels in place, let it dry fully for at least 30 minutes. Don't rush this step—patience here prevents collapse later.
- Decorate with joy:
- Once your frame is set, this is the fun part. Drizzle white chocolate around the edges. Stick candies on with dots of royal icing, creating patterns that make sense to you. Sprinkle glitter if you're using it. There's no wrong way to do this—it's your creation. Let the decoration set for a few minutes before moving the frame.
- Present your masterpiece:
- Place the finished gingerbread house frame on a serving platter and arrange additional cookies, nuts, or holiday treats around it like you're framing a photograph. Step back and admire what your hands have built. Take a photo if you want. This is the moment where your kitchen work becomes table magic.
 Pin It
 The first time someone asked for the recipe, I realized this gingerbread frame had become more than a decoration—it was a memory. My neighbor took a photo of it and used it as her holiday card that year. Seeing your creation become part of someone else's celebration changes how you feel about baking forever.
Why Gingerbread Gets Better Each Year
Gingerbread has this beautiful quality where your confidence grows with each attempt. The first time you assemble the frame, you're nervous about every seam. The second year, your hands know what to do. By the third year, you're improvising decorations and adding your own touches because you understand the structure. It's one of those projects that rewards practice in the most delicious way, and I'm telling you this because permission to start where you are—imperfect and learning—matters.
Making This Frame Your Own
The recipe I've shared is a foundation, not a rulebook. Once you've made it once, you start noticing what you'd change. Want darker gingerbread? Add cocoa powder to the dough. Prefer different spices? Adjust them. Want to use vegan butter and aquafaba for the icing? Go ahead. The people who create the best versions of dishes are the ones brave enough to adapt them. Your kitchen, your rules. Your gingerbread frame should taste and look like you made it, because you did.
The Warmth of Building Together
If you're making this with someone else, that's when the magic multiplies. One person can roll and cut while another assembles. A child can decorate while you do the careful work. The kitchen becomes a place where something beautiful happens in stages, with hands working toward something shared. That warmth, that togetherness—that's what this frame really holds.
- If a panel cracks slightly during assembly, a little extra royal icing smoothed along the crack will hide it completely and reinforce it
- Leftover gingerbread dough freezes beautifully for up to three months, so you can make smaller cookies anytime you're feeling festive
- If you have extra royal icing, it keeps in an airtight container for a few days and can decorate cookies or embellish anything else that needs edible glue
 Pin It
 This gingerbread house frame is edible proof that you can build something beautiful in your own kitchen. Serve it surrounded by love, eat it when you're ready, and remember that the people around your table are the real feast. Happy building.
Recipe FAQs
- → What spices are used in the dough?
The dough includes ground ginger, cinnamon, and cloves to evoke classic holiday flavors.
- → How is the frame assembled?
Panels are attached with royal icing acting as glue and left to dry for stability before decorating.
- → Can I prepare the panels ahead of time?
Yes, baking the panels a day in advance and storing them airtight helps achieve extra sturdiness.
- → Are there options for dietary preferences?
Royal icing can be swapped for vegan alternatives to accommodate dietary needs.
- → How to decorate the frame effectively?
Use melted white chocolate, assorted candies, sprinkles, and edible glitter to create a festive look.
- → What tools are recommended for shaping?
Use a gingerbread house template or knife, rolling pin, and piping bag for precise cuts and decoration.