 Pin It
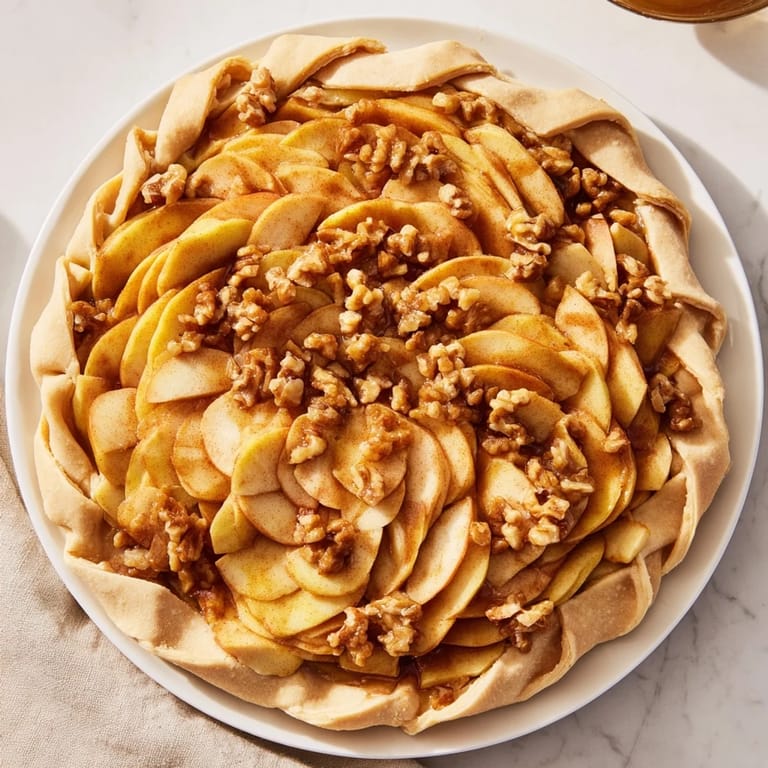
 My sister called me the week before Thanksgiving, breathless with a request: could I make something that would stop everyone mid-conversation when it hit the table? She'd seen a photograph online of apple slices woven into a perfect lattice and couldn't stop thinking about it. I'd never attempted anything quite so architectural in a dessert, but there was something magnetic about the challenge. When I finally pulled it from the oven, the kitchen filled with this honeyed, cinnamon-sweet warmth, and I knew exactly why she'd been captivated.
I remember sliding this tart onto the dessert table at a small dinner party, and my friend immediately started photographing it before anyone could take a slice. The way the honeyed apples caught the light, still warm and glistening, felt like the whole evening had been building toward that single moment. She later told me she'd made it three times since, each time tweaking it just slightly, which felt like the highest compliment.
Ingredients
- All-purpose flour (1 1/4 cups): The foundation of a tender crust; keeping it cold and handling it minimally prevents toughness.
- Unsalted butter (1/2 cup), cold and cubed: Cold butter creates those delicate flakes that make pastry sing; let it warm even slightly and you lose that texture.
- Granulated sugar for crust (2 tbsp): Just enough sweetness to balance the richness without making the crust cake-like.
- Salt (1/4 tsp plus 1/8 tsp): A pinch in the crust and filling amplifies all the other flavors without tasting salty itself.
- Ice water (3–4 tbsp): Cold water helps the dough stay tender; add it gradually so you don't accidentally make it tough.
- Walnuts, chopped (1 cup): Toasty and slightly bitter, they anchor the sweetness of honey and keep the filling from feeling one-dimensional.
- Honey (1/4 cup): The soul of the filling—use something fragrant and good quality if you can, it makes a real difference.
- Light brown sugar (2 tbsp): Adds a subtle molasses note that deepens the walnut flavor.
- Ground cinnamon (1/2 tsp plus 1/2 tsp): Warm and familiar, it ties the whole dessert together across crust and apples.
- Firm, sweet-tart apples like Honeycrisp or Granny Smith (3 large): They hold their shape during baking and won't collapse into mush, which is crucial for the lattice to stay structured.
- Lemon juice (1 tbsp): Prevents browning and brightens the apple flavor so it doesn't get lost under all the richness.
- Granulated sugar for apples (2 tbsp): Caramelizes slightly in the oven, creating those golden edges.
Tired of Takeout? 🥡
Get 10 meals you can make faster than delivery arrives. Seriously.
One email. No spam. Unsubscribe anytime.
Instructions
- Make the crust:
- Mix flour, sugar, and salt in a bowl, then work in cold butter cubes until the mixture looks like coarse breadcrumbs—you want little butter pieces throughout so they create steam pockets and flaky layers. Add ice water one tablespoon at a time, stirring gently until the dough just barely holds together.
- Chill and press:
- Press the dough evenly into your tart pan, working it up the sides, and refrigerate for 15 minutes while the oven preheats to 375°F. This resting time prevents the crust from shrinking during baking.
- Blind bake:
- Line the crust with parchment and fill it with pie weights or dried beans to keep it from puffing up, bake for 12 minutes, then remove the weights and bake another 5 minutes until the bottom is set and the edges are barely golden. This partial bake ensures the crust stays crisp even with a moist filling.
- Build the filling layer:
- Combine walnuts, honey, brown sugar, cinnamon, and salt, then spread this mixture in an even layer over the cooled crust. It should feel almost like a sticky paste holding the nuts together.
- Slice the apples thin:
- Peel your apples if you prefer a smoother texture (I usually do), remove the cores, and slice them lengthwise as thinly as you can manage—about the thickness of a credit card works perfectly. Toss the slices immediately with lemon juice, sugar, and cinnamon so they don't brown.
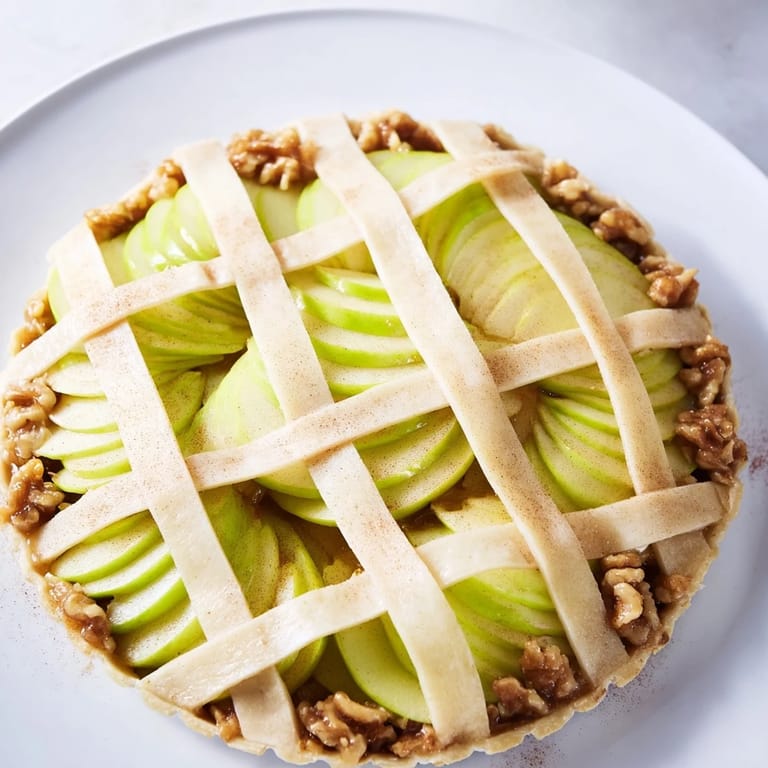
- Weave the lattice:
- Lay half your apple slices parallel on a piece of parchment with their edges slightly overlapping, then weave the remaining slices over and under to form a crisscross pattern. It's easier to build it on parchment first, then carefully slide the whole thing onto the tart and trim the edges.
- Bake and finish:
- Cover the tart loosely with foil and bake for 20 minutes to protect the edges from browning too fast, then remove the foil and bake another 10–15 minutes until the apples are tender and lightly caramelized on top. Let it cool for at least 20 minutes so the filling sets and the slices hold their shape when you cut.
 Pin It
 I brought this tart to a potluck once and placed it at the far end of the dessert table, thinking it would be overshadowed by faster crowd-pleasers. Instead, people kept circling back to it, slicing off thin pieces and standing there quietly, clearly surprised by how the walnuts and honey were talking to each other underneath the apples. That's when I realized some desserts don't need to shout; they just need to be patient and let the flavors do the work.
Why This Works So Well
The real magic happens in the layering. A crust that's been partially baked stays crisp even with moisture from the apples pressing down. The walnut-honey filling acts like a buffer, absorbing some liquid while adding richness and structure. The thin apple slices cook quickly and evenly, staying tender without turning into applesauce. Together, these three layers create something that's greater than any one of them alone.
A Word on Apples
You want apples that are firm and slightly tart so they hold their shape during baking and don't turn mushy. Honeycrisp apples are sweet with a crisp bite, which plays beautifully against the honey in the filling. Granny Smiths are more austere and acidic, which some people prefer because they cut through all the richness. Mix them if you want complexity, or stick with one variety for a cleaner flavor profile.
Serving and Storing
Serve this warm from the oven with a scoop of vanilla ice cream, or wait until it's completely cool and serve it at room temperature with coffee or tea. It stays beautiful for two days covered at room temperature, and the flavors actually mellow slightly as it sits, becoming more harmonious. Some bakers brush the lattice with warmed apricot jam after baking for extra gloss and shine, which is worth trying if you want to take it up a notch.
- Store leftovers loosely covered so the crust doesn't get soggy from steam.
- If you're making this ahead, assemble everything except the lattice, then add the apples an hour or two before baking.
- For a gluten-free version, a quality gluten-free flour blend works beautifully in the crust.
 Pin It
 This tart taught me that the most impressive desserts aren't always the most complicated ones. There's something deeply satisfying about taking simple ingredients—butter, apples, honey, walnuts—and arranging them so carefully that people gasp when they see it emerge from the oven.
Recipe FAQs
- → How do I create the lattice top with apples?
Slice apples very thinly, then arrange half in parallel rows. Weave the remaining slices over and under to form a lattice before transferring it onto the tart.
- → Can I use different nuts instead of walnuts?
Yes, pecans make a delicious alternative that pairs well with the honey and cinnamon flavors.
- → How to prevent the crust from sogginess?
Blind bake the crust before adding filling to keep it crisp and golden.
- → What apple varieties work best for this dessert?
Firm and sweet-tart apples like Honeycrisp or Granny Smith hold their shape well and add balanced flavor.
- → Is it necessary to brush the lattice after baking?
Brushing with warmed apricot jam after baking adds a lovely gloss and extra sweetness but is optional.